Easy AVR config file: Here. (right click, save link/target as)
Download it, and place it in the .EasyAVR/boards folder inside your home directory.
On windows, this is usually C:\Users\[$your_user_name]\.EasyAVR\boards\
On Linux, this is usually ~/.EasyAVR/boards/
Note: You must run Easy AVR at least one time to create the .EasyAVR directory!
With this file, orient your diodes so the black bar is on the bottom (square hole)
QMK firmware for Pro Micro via KBFirmware.com config file: Here. (right click, save link/target as)
Browse to kbfirmware.com click Upload, and select the file
you downloaded.
Once the file loads, you can modify it to fit your layout, and generate the compiled firmware on the
webpage, or download the source files on your own to edit and compile!
QMK firmware for Teensy 2.0 via KBFirmware.com config file: Here. (right click, save link/target as)
Browse to kbfirmware.com click Upload, and select the file
you downloaded.
Once the file loads, you can modify it to fit your layout, and generate the compiled firmware on the
webpage, or download the source files on your own to edit and compile!
Pro Micro Pin assignments
col0
B4
row0
D2
col1
D7
row1
D1
col2
D0
row2
F5
col3
E6
row3
B5
col4
D4
col5
F6
col6
F4
col7
F7
col8
B1
col9
B3
col10
C6
col11
B2
Teensy 2.0 Pin assignments
col0
C6
row0
B0
col1
D2
row1
B3
col2
B7
row2
F6
col3
D3
row3
C7
col4
D0
col5
F7
col6
F5
col7
B6
col8
B5
col9
B4
col10
D1
col11
D7
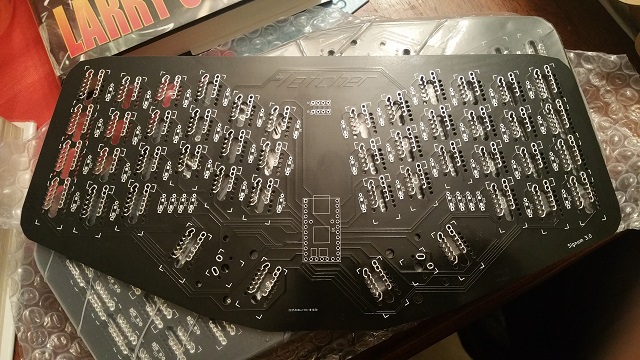
The Signum 3.0 PCB makes it easy to DIY an ergonomic mechanical keyboard customized to
your needs and hand size! Add
diodes(1N4148),
your choice of
keycaps
and
switches
(Cherry and Alps compatible, PCB mount/5 pin works best!), your choice of
micro controller(Teensy 2.0 or ProMicro compatible!),
and you're ready to solder!
Watch the video build guide for the Signum 3.0 HERE!
Easy AVR config file: Here. (right click, save link/target as)
Download it, and place it in the .EasyAVR/boards folder inside your home directory.
On windows, this is usually C:\Users\[$your_user_name]\.EasyAVR\boards\
On Linux, this is usually ~/.EasyAVR/boards/
Note: You must run Easy AVR at least one time to create the .EasyAVR directory!
With this file, orient your diodes so the black bar is on the bottom (square hole)
KBFirmware.com config file: Here. (right click, save link/target as)
Browse to kbfirmware.com click Upload, and select the file
you downloaded.
Once the file loads, you can modify it to fit your layout, and generate the compiled firmware on the
webpage, or download the source files on your own to edit and compile!
Pro Micro Pin assignments
col0
B4
row0
D2
col1
D7
row1
D1
col2
D0
row2
F5
col3
E6
row3
B5
col4
D4
row4
B2
col5
F6
row5
C6
col6
F4
col7
F7
col8
B1
col9
B3
Teensy 2.0 Pin assignments
col0
C6
row0
B0
col1
D2
row1
B3
col2
B7
row2
F6
col3
D3
row3
C7
col4
D0
row4
D7
col5
F7
row5
D1
col6
F5
col7
B6
col8
B5
col9
B4
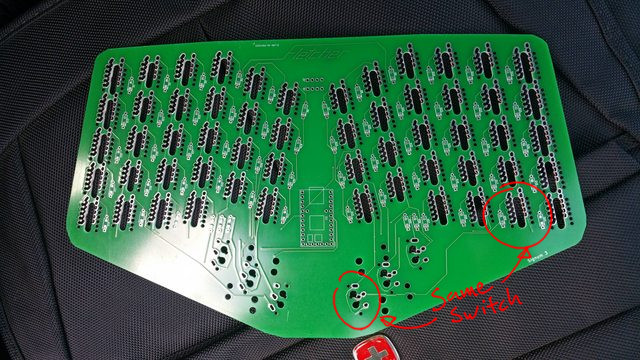
Note: K59A1 and K59B1 along with K50A1 and K50B1 are the same switch! This gives you the option of 3 switches in the thumb cluster. You may populate one or both positions, but they will act as the same switch!
Note: In order to fit 60 keys on 16 pins the PCB uses a non-standard matrix! The center two
columns act as a bottom (6th) row! Check the KBfirmware wiring diagram for a visual!
The Signum 3.1 PCB makes it easy to DIY an ergonomic mechanical keyboard customized to
your needs and hand size! Also it has a number row! Add
diodes(1N4148),
your choice of
keycaps
and
switches
(Cherry and Alps compatible, but Cherry PCB mount/5 pin works best!)), your choice of
micro controller(Teensy 2.0 or ProMicro compatible!),
and you're ready to solder!